
type
status
date
summary
tags
category
URL
password
slug
icon
最近跟风用上了 Azure for Students 的 100 美元赠金,大致看了一下 Azure 提供的服务,其中虚拟机和 AI 服务比较有吸引力。我粗略查看下,Azure 的 AI 服务似乎只能使用 OpenAI 的模型,但是已经把 Chat2API 反复使用,甚至自行修改使用后,基本上相当于已经手持用不完的 GPT-4o 模型了,且多模态用惯了之后,对新出的 o1-mini 等针对特定领域特化的纯文本模型又不是特别感兴趣,于是我就直接放弃了使用 Azure 的 AI 服务。
于是我的目光盯上了虚拟机。在群友的提醒下,得知勾选 “Spot” 规格,可以获得接近 90% 的折扣,于是,在并未搞明白有什么区别的时候,就直接开了一台 “Spot” 规格的机器。心想大厂服务器肯定靠谱,顺手就部署了一个 Chat2API 以及 ChatGPT 镜像站,以供群友使用。
不出意外的话,意外就出现了。没过两天,OAIFREE 的服务突然宕机,我想着我还有自己的镜像站能用,于是打开网页查看,发现服务掉线了。然后我登上 Azure 一看,被关机了。我才知道这个 “Spot” 规格到底是什么意思。简而言之,你可以选择两种前置条件:
- 当数据中心的资源不充裕时;
- 当数据中心的资源不充裕或者账户余额不足时。
当满足前置条件时的处理也有两种选择:
- 关机;
- 删除机器。
还好,我当时稀里糊涂之下选择的是当资源不充裕时关机,所以手动开机之后又一切正常了。但是这样动不动就需要手动登录面板开机的话,实在是太难用了,于是我开始寻找关机后自动开机的方法。于是我找到了:教你稳定1折使用Azure的服务器,让Azure不在那么贵不可及
按照这篇帖子的操作,我自己折腾了半天,拉不起来。后来才发现是自己没正确理解原贴中文字描述而不带图片的几个步骤,所以没能成功拉起。后来我又找到了一篇英文的说明,也是参考上述 Hostloc 的帖子,而博主又自行添加了一些说明以及截图,结合两篇说明外加自行摸索了好一会儿,我才完全弄明白。附上那篇英文博文的地址:Auto Start Stopped Spot Instance to Get Your VM Running Again。
设置 Spot 规格虚拟机自动启动
跳过创建虚拟机的部分,直接来说 Spot 规格的虚拟机如何自启的方法。首先,原理是利用 Azure 自带的监控功能,监控虚拟机状态,并发出警报。已知警报可以触发自动化流程,故编写一个自动化流程以开启虚拟机,即可完成自动启动。
创建自动化账户
首先新建一个 Automation Accounts,直接在 Azure 面板的搜索栏里搜索
Automation 即可找到: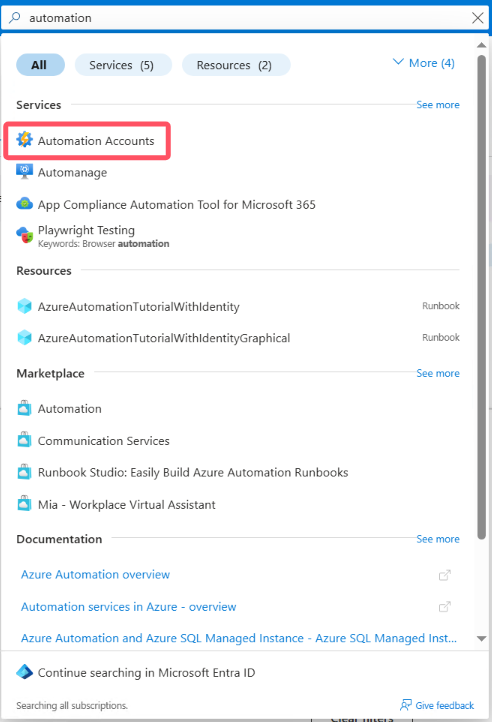
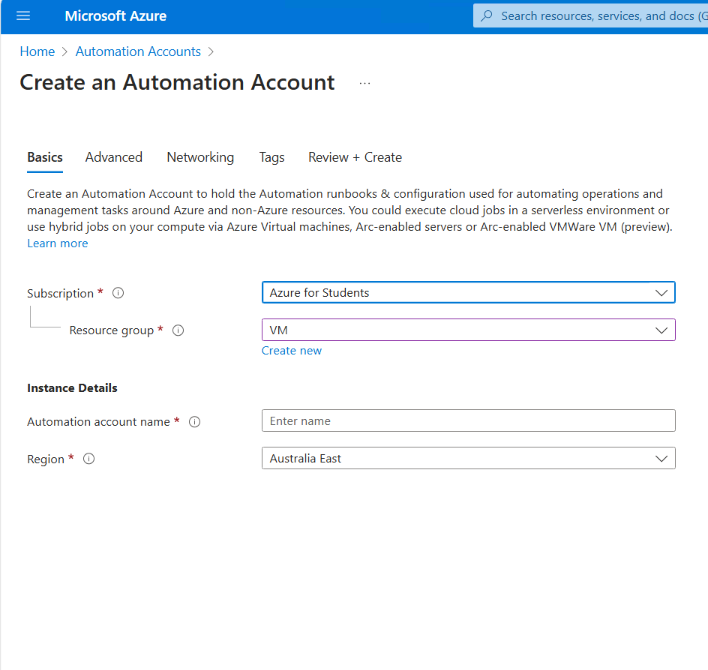
切记创建 Automation Accounts 时,订阅要和你的虚拟机所在的订阅相同(绑卡用户使用 Pay as you go,edu 订阅使用 Azure for Students)资源组最好也选择和虚拟机相同的资源组。随便键入一个名字即可。其他选项全部默认,一路 Next 直到创建。
添加启动脚本为 Runbooks
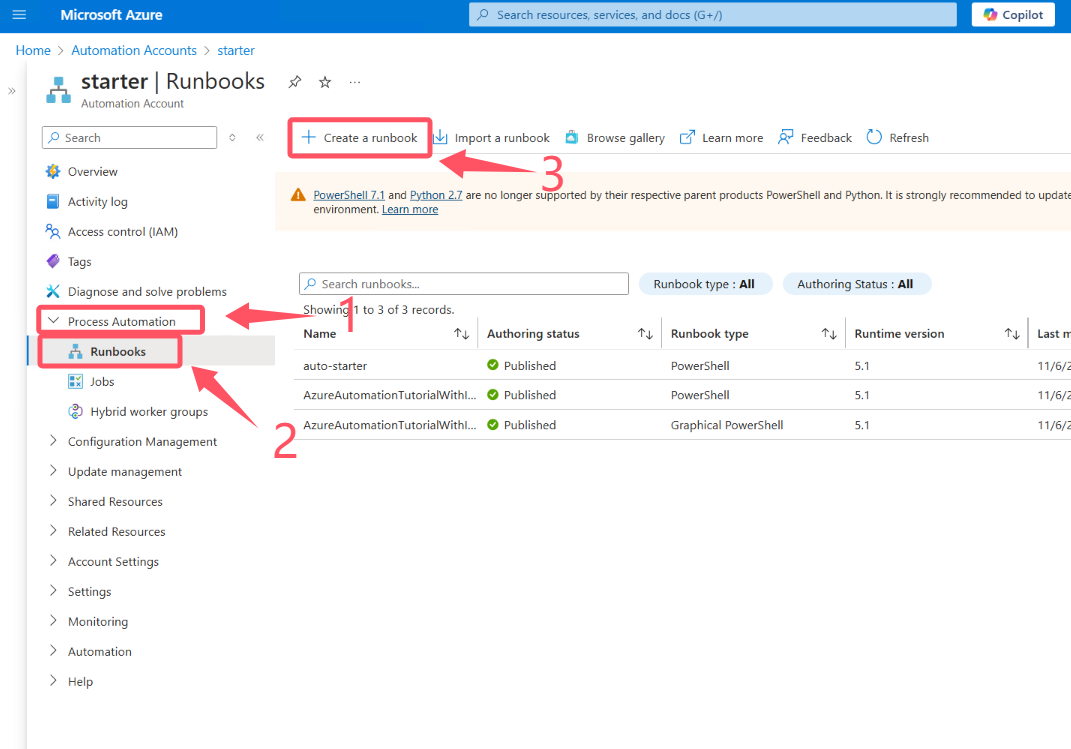
接下来在这个自动化账户内,侧边栏里找到 Processing Automation,点击其中的 Runbooks,再点击 Create a runbook。
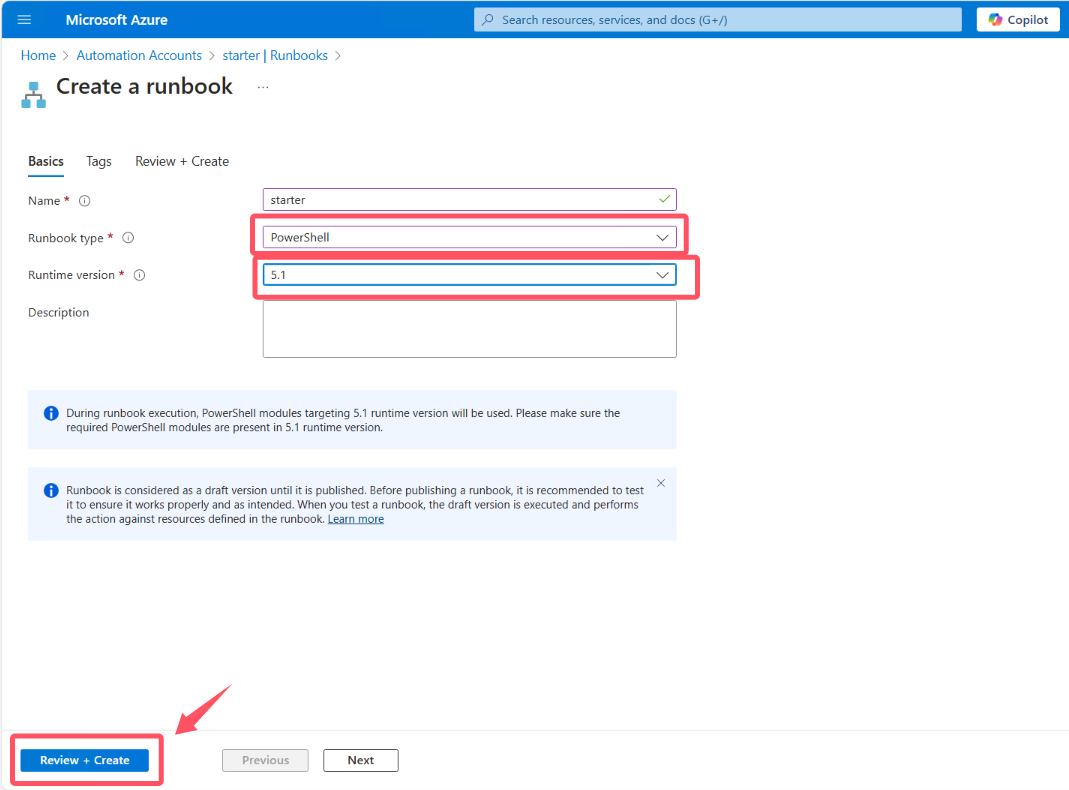
类型选择 PowerShell,Runtime Version 选择 5.1,随便取个名字,然后直接创建。
在编辑内粘贴以下脚本,不要做其他修改,直接点击 Public 发布。
PS1
12345678910111213141516171819202122232425262728293031323334353637383940414243444546474849505152535455565758596061626364656667686970717273747576777879808182838485 | param ( [Parameter(Mandatory=$true)] [String] $Action, [Parameter(Mandatory=$true)] [String] $TagName, [Parameter(Mandatory=$true)] [String] $TagValue) Write-Output ""Write-Output "------------------------ Authentication ------------------------"Write-Output "Logging into Azure ..."try { "Logging in to Azure..." Connect-AzAccount -Identity}catch { Write-Error -Message $_.Exception}$SubscriptionId = "<YOUR SUBSCRIPTION ID>"Select-AzContext -name ((Get-AzContext -ListAvailable).Name -match $SubscriptionId)[0]try { if ($Action -eq "Start" -or $Action -eq "Stop") { Write-Output "Action Selected" } else { Write-Output "Wrong Action Selection. It should be Start or Stop" Exit }} catch { Write-Error -Message $_.Exception}try { Write-Output "" Write-Output "" Write-Output "---------------------------- Status ----------------------------" Write-Output "Getting all virtual machines with Tags ..." $myvms = Get-AzVM | Where-Object { $_.Tags[$TagName] -eq $TagValue } Write-Output "Total of VMs: $($myvms.Length)" foreach ($vm in $myvms) { Write-Output $vm.Name $status = Get-AzVM -Name $vm.Name -Status Write-Output "VM $($vm.Name) status: $($status.PowerState)" if ($Action -eq "Start") { if ($status.PowerState -eq "VM deallocated") { Write-Output "Starting VM: $($vm.Name)" try { Start-AzVM -Name $vm.Name -ResourceGroupName $vm.ResourceGroupName -NoWait } catch { Write-Error -Message $_.Exception } } else { Write-Output "VM: $($vm.Name) is already started" } } if ($Action -eq "Stop") { if ($status.PowerState -eq "VM running") { Write-Output "Stopping VM: $($vm.Name)" try { Stop-AzVM -Name $vm.Name -ResourceGroupName $vm.ResourceGroupName -Force -NoWait } catch { Write-Error -Message $_.Exception } } else { Write-Output "VM: $($vm.Name) is already stopped" } } }}catch { Write-Error -Message $_.Exception} |
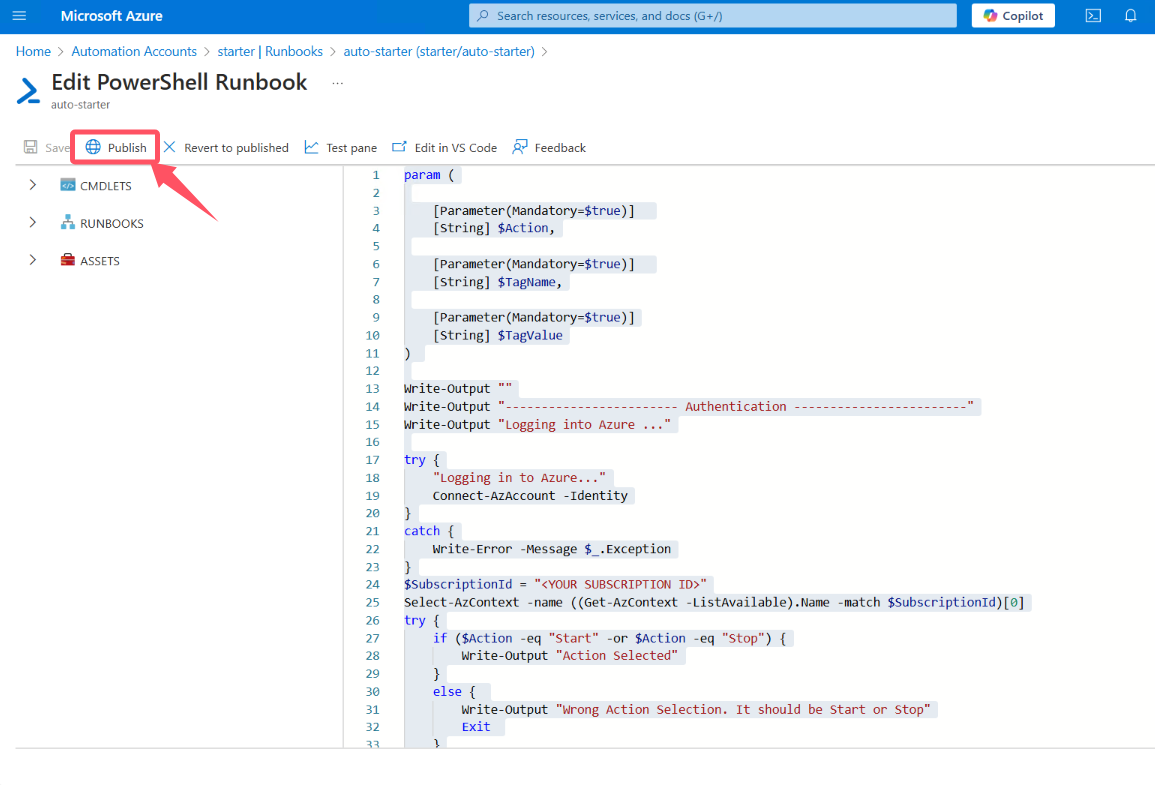
回到自动化账户的 Runbooks 下,看到刚刚新建的 Runbooks 已经显示为 Published 则成功添加了自启脚本。
为自动化账户添加权限
在搜索栏内搜索
Subscription,并进入订阅页: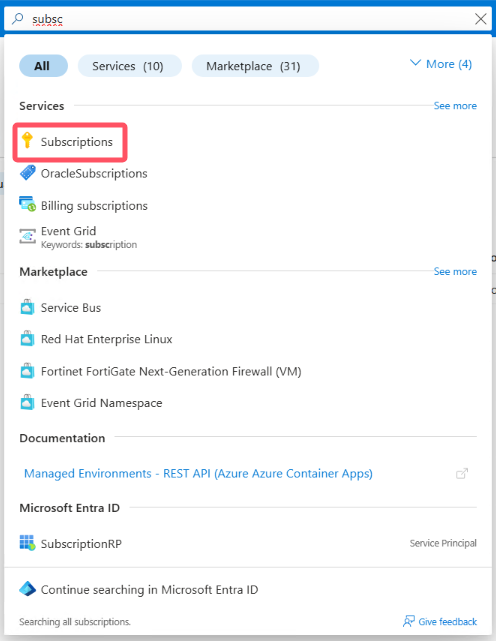
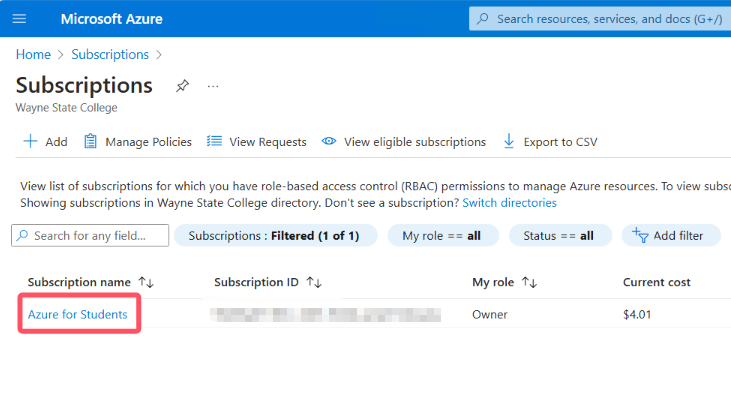
选择你的订阅(绑卡用户使用 Pay as you go,edu 订阅使用 Azure for Students)并进入:
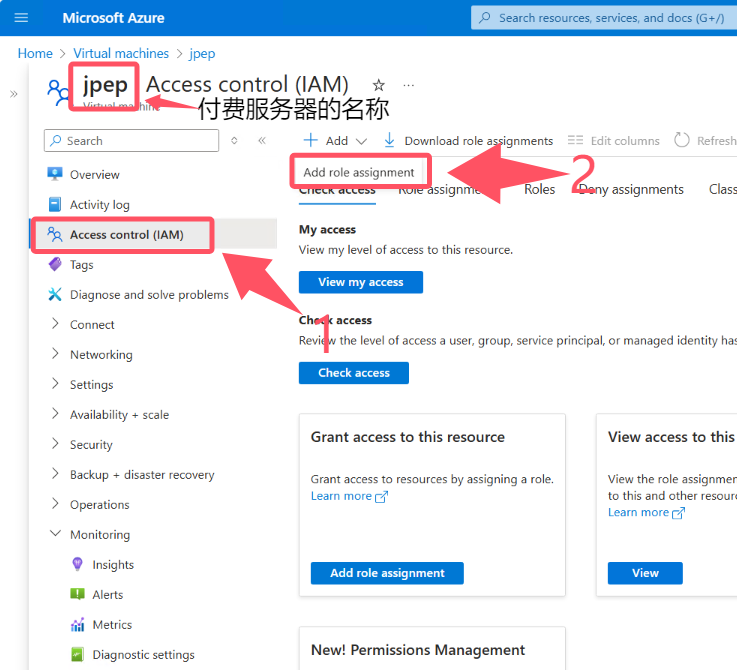
然后在侧边栏 Access control (IAM) 中,点击 Add role assignment:
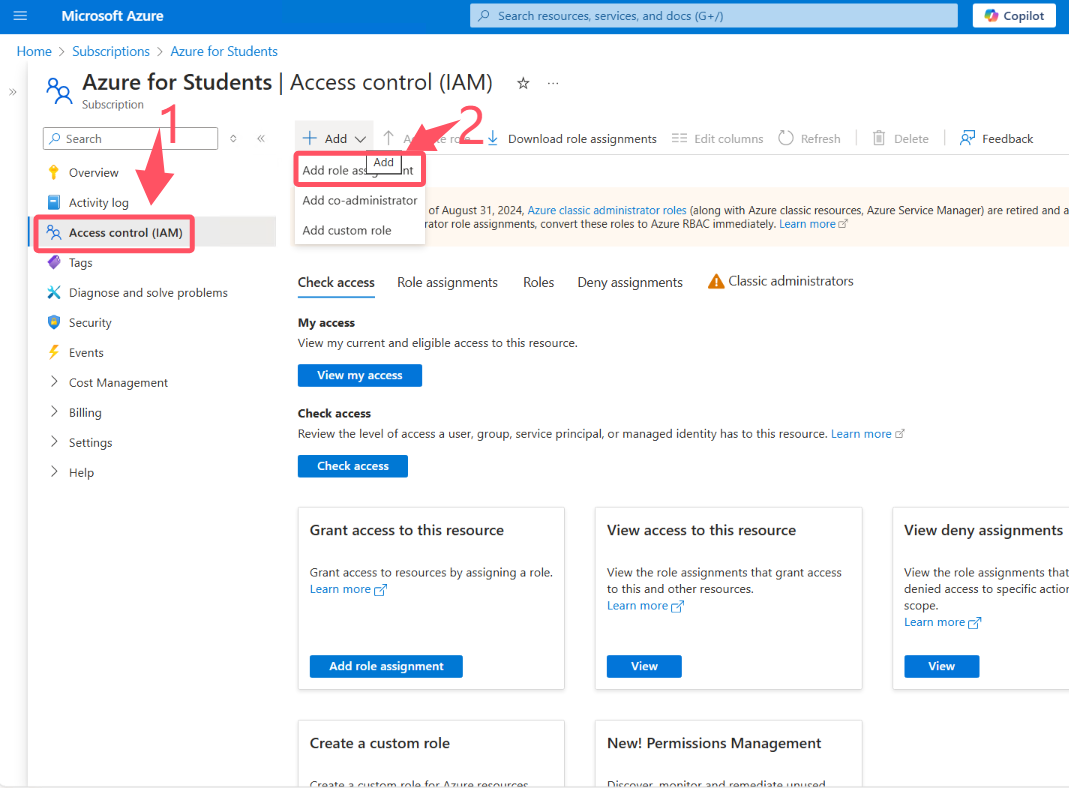
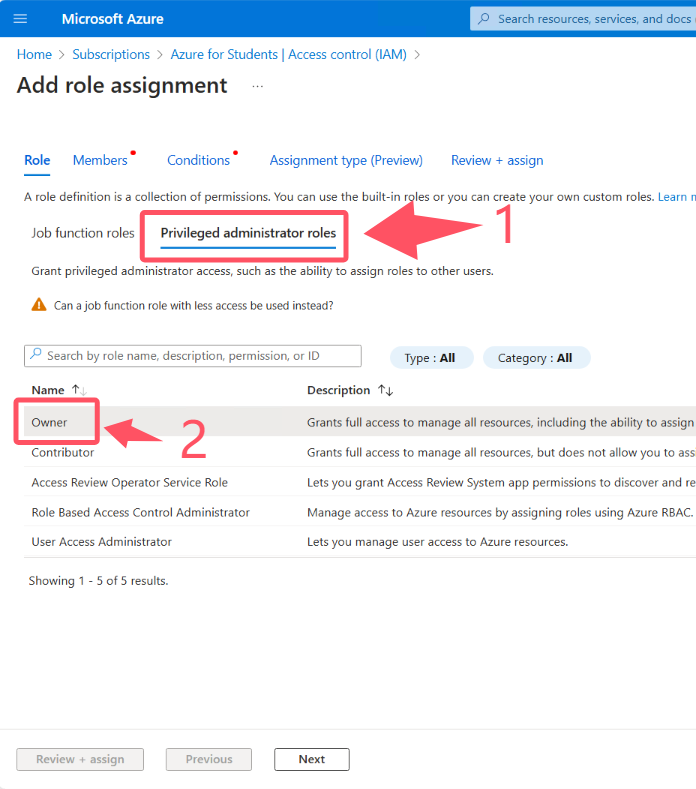
Role 选项的设置中,选择 Privileged administrator roles 中的 Owner 角色:
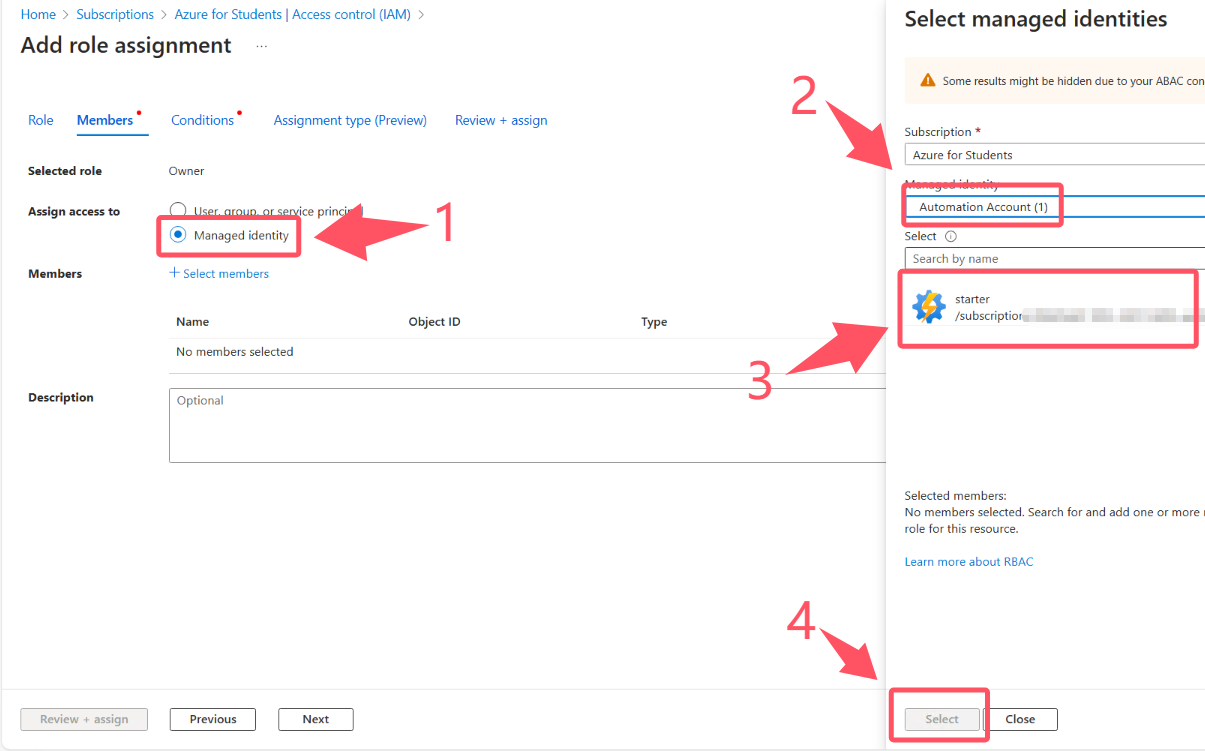
Member 选项中,Assign access to 选择 Managed identity,依次选择 Automation Accounts,以及刚刚创建的自动化账户:
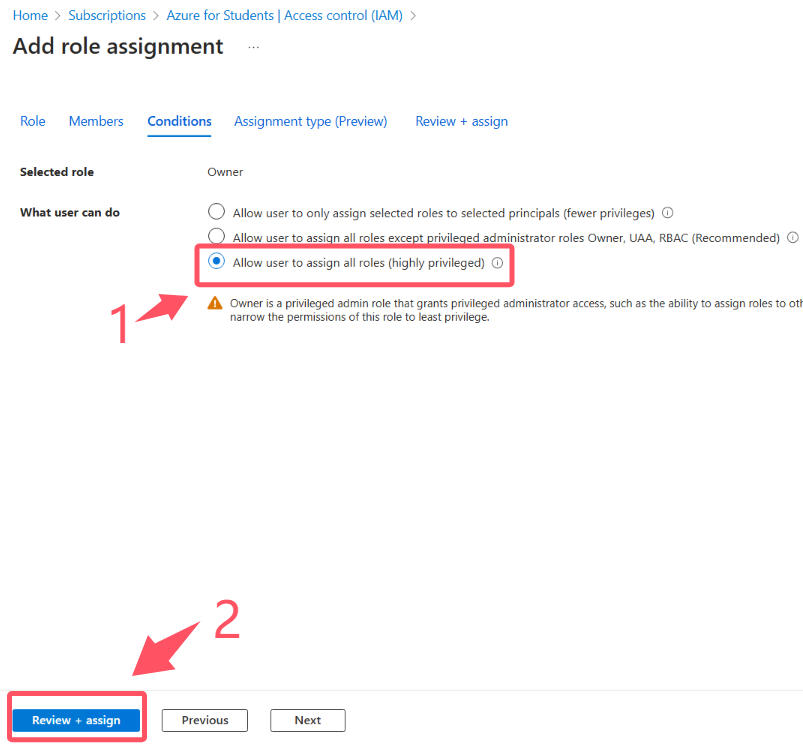
Conditions 选项中,What user can do 选择第三项,然后直接 Review + assign:
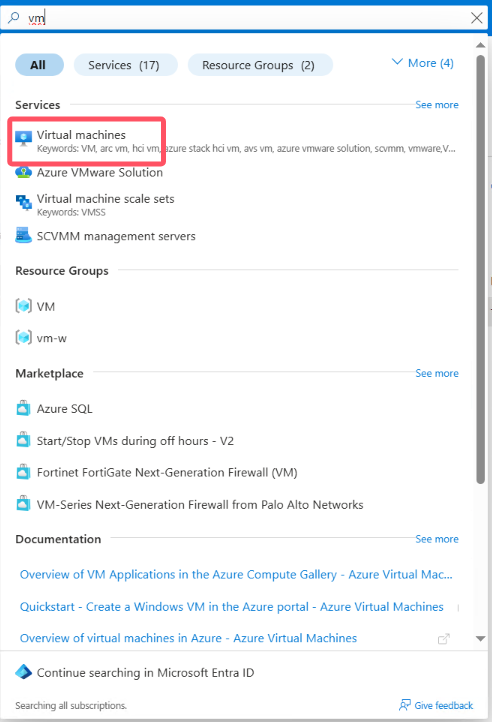
添加完订阅的权限后,再到搜索栏搜索 vm,并进入虚拟机管理的页面:
然后找到需要设置自动启动的 Spot 虚拟机,为重复上述操作,再次添加权限:
顺带给这台虚拟机添加一个标签,可以随意填写,我这里填写的是 1000:100:

为虚拟机添加监控警报
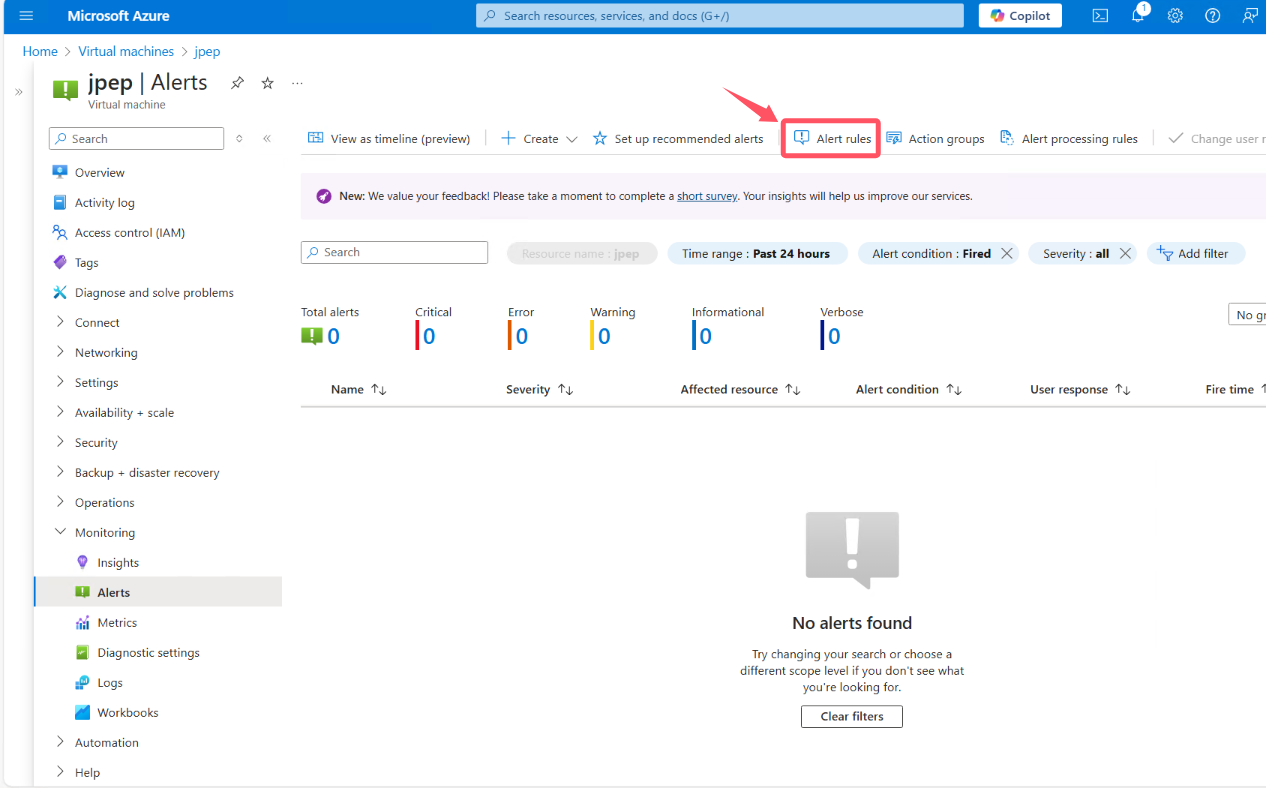
找到侧边栏中的 Monitoring,进入其中的 Alerts,点击 Alerts rules(我这里已经添加过规则了所以显示不太一样,入口是一样的):
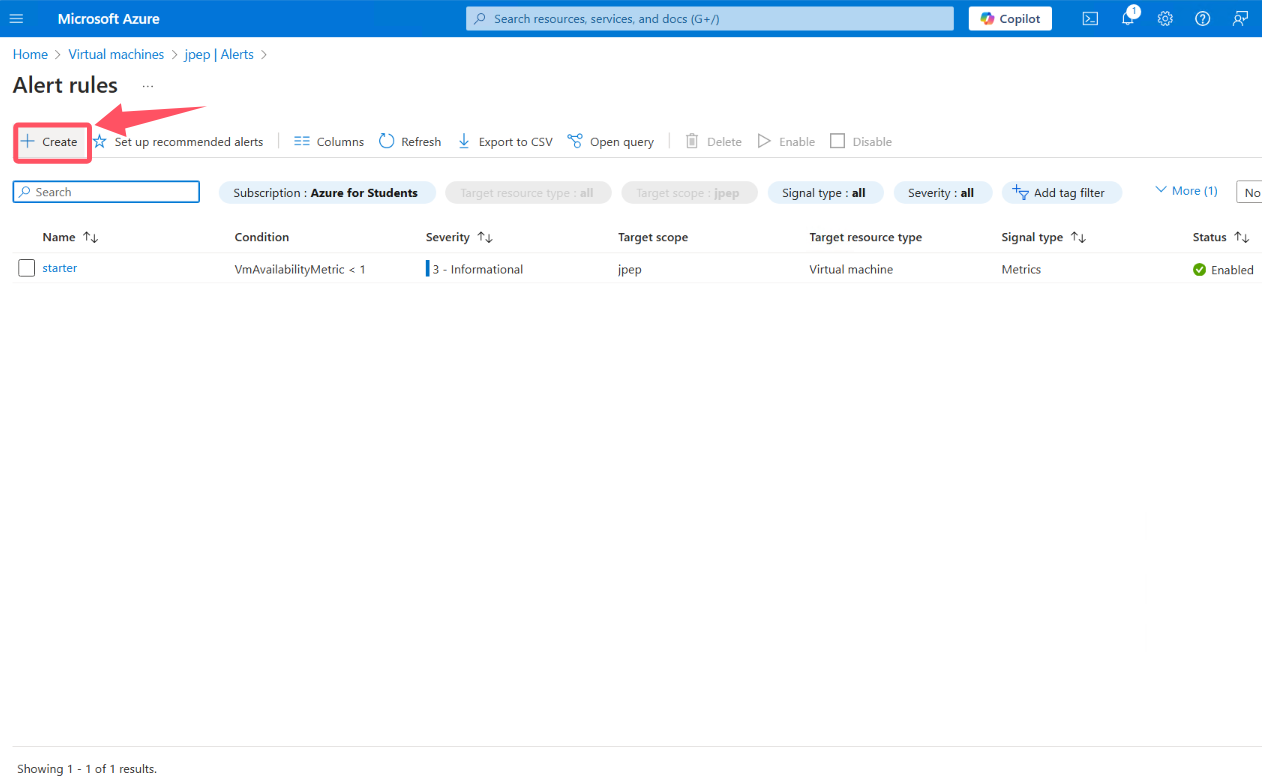
新建一个警报规则:
在 Condition 选项中选择信号时不要点下拉栏,直接点击 see all signals,并在弹窗中搜索
availability,选择 VM Availability Metric (Preview):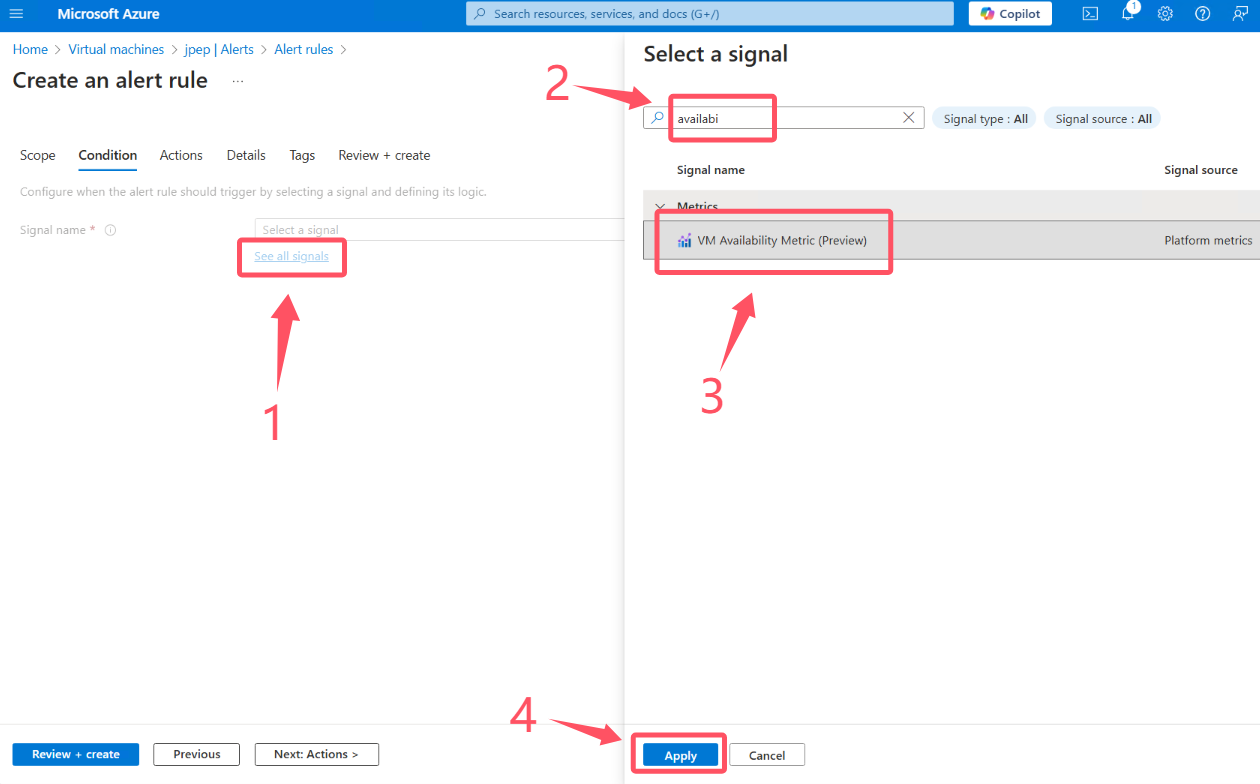
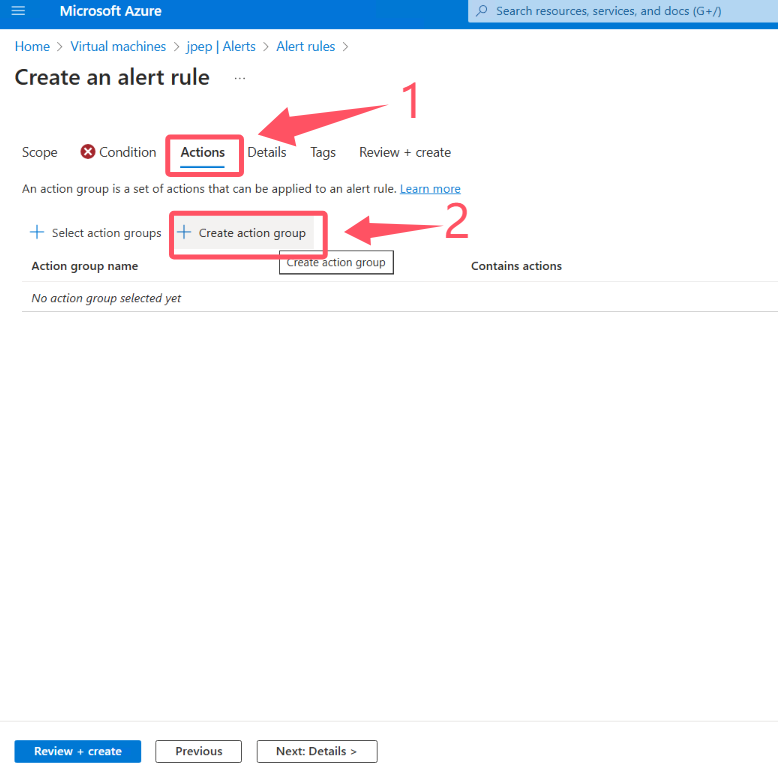
在 Actions 选项中新建一个 action group:
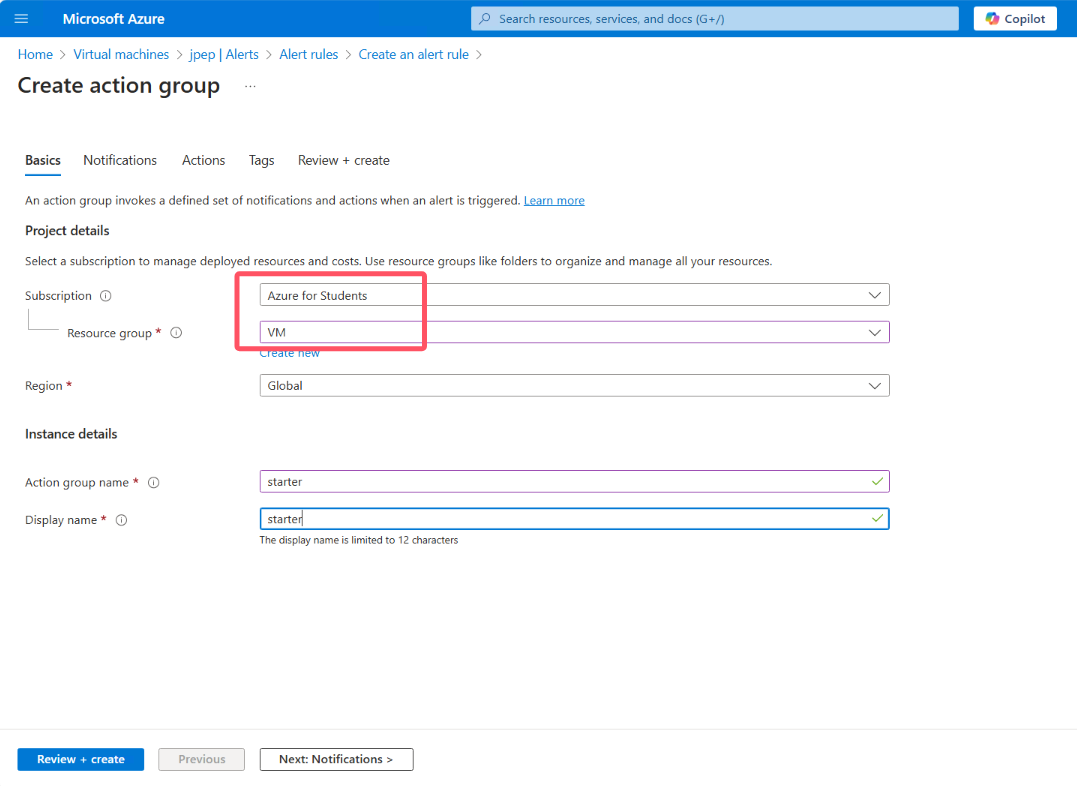
新建 action group 时,订阅和资源组最好与需要自启的虚拟机以及自动化账户相同,随便取个名字就好:
Notifications 可设置也可不设置,只是一个提醒,能发邮件或者发短信什么的,发短信需要额外收费,有需要的可以自行设置。
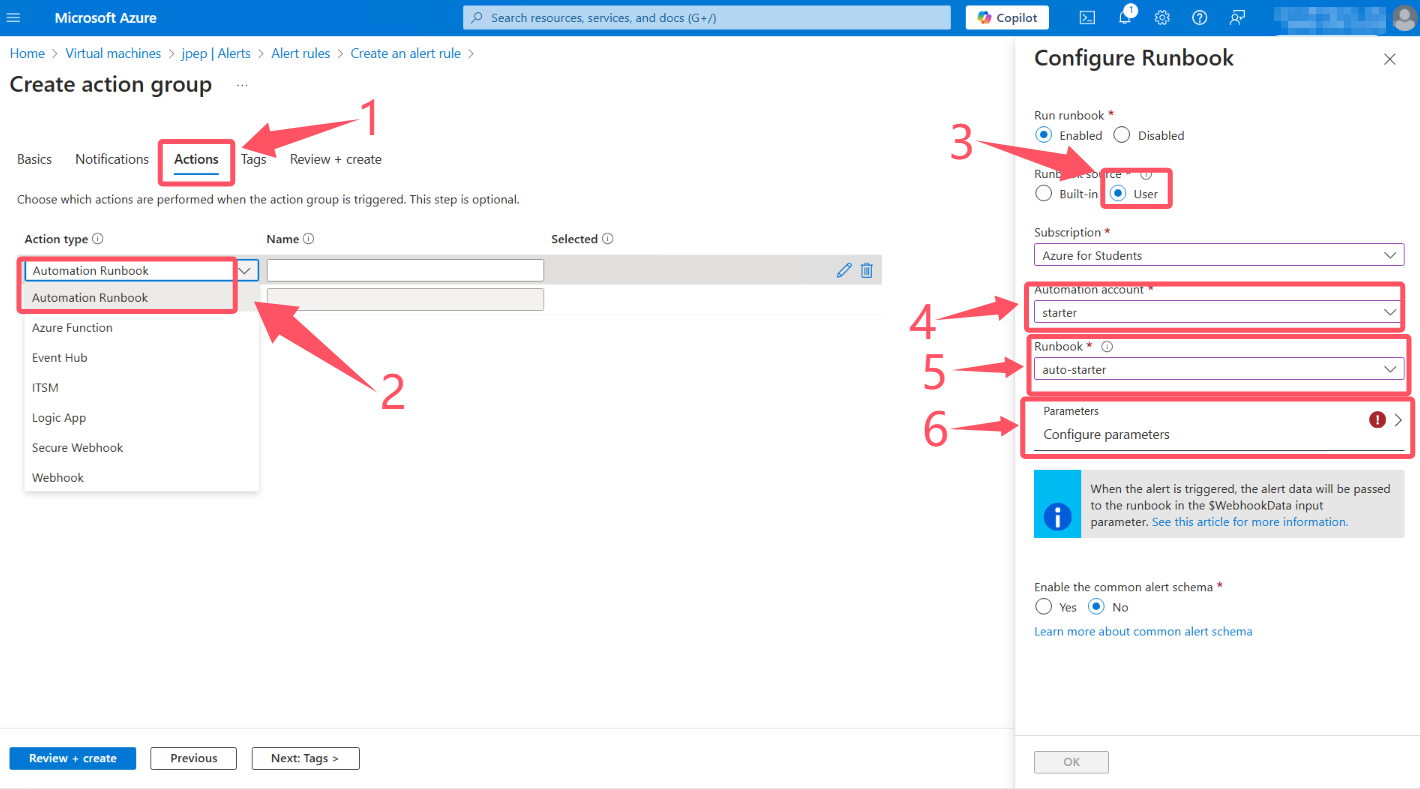
Actions 中 Action type 选择 Automation Runbook,弹出的窗口中 Runbook source 选择 User,Automation account 选择刚刚创建的自动化账户,Runbook 选择刚刚新建并发布的 Runbook,再点击 Parameters 填入变量:
第一个填
Start,切记首字母大写,第二三个按照刚刚给虚拟机添加的标签进行填写,比如刚刚我添加的标签为 1000:100,那么我第二个填 1000,第三个填 100。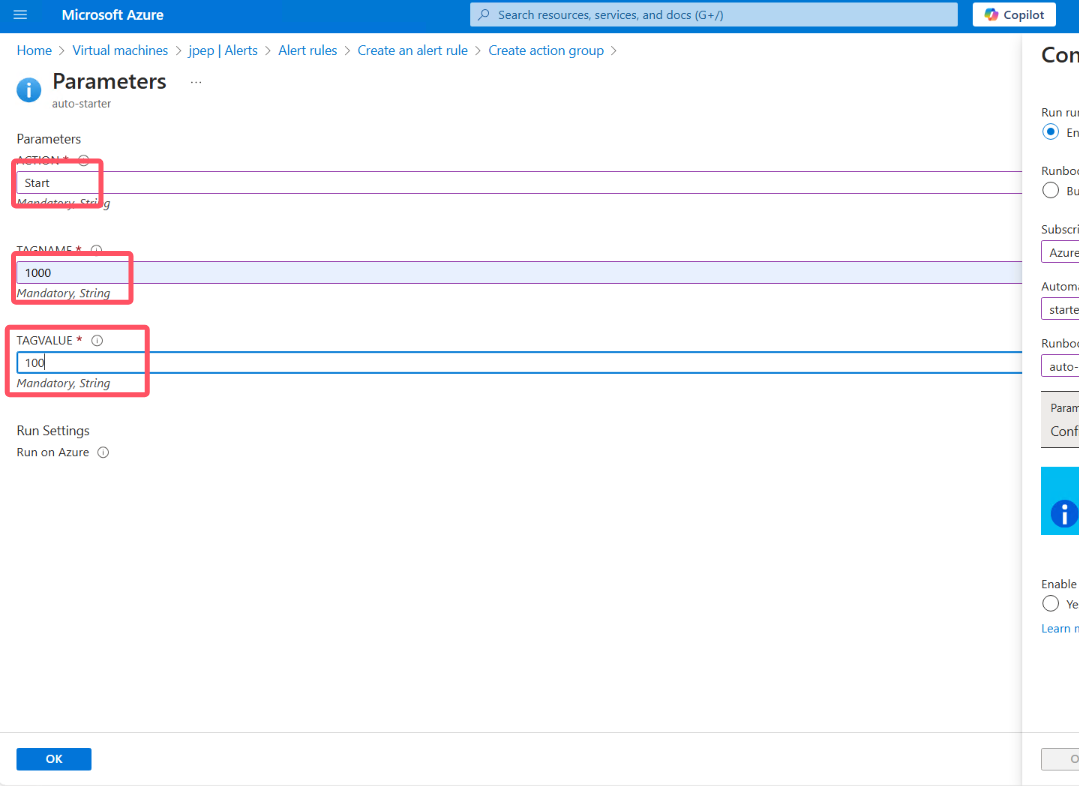
然后点击 OK 保存,再点击侧边弹窗的 OK 保存,然后直接点击 Review + create 创建 action group。
创建完 action group 后回到创建 alerts rule 的页面,当然 Actions 选择刚刚创建的 action group,而 Condition 中,Aggregation type 选择 Minimum,Operator 选择 Less than,Unit 选择 Count,Threshold 选择 1:
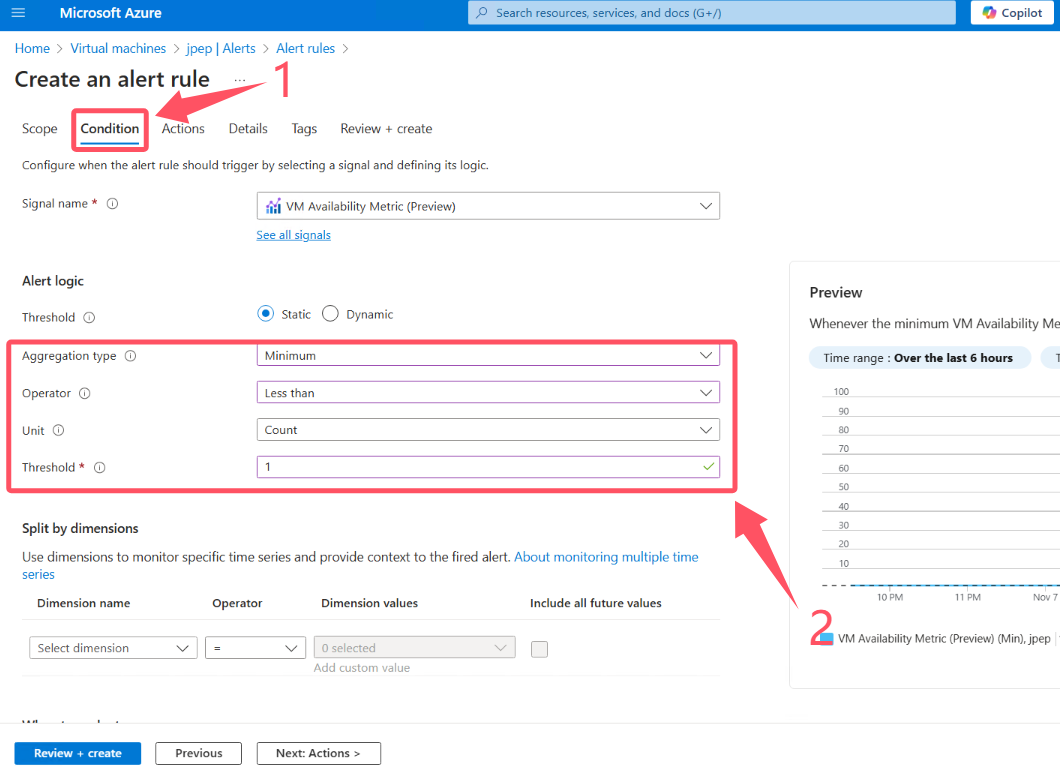
然后 Review + create 创建警报规则即可。
测试自动启动
完成了以上步骤,自动启动就已经设置好了,你可以在 Overview 中手动停止虚拟机进行测试,大概 5-6 分钟即可完成自动启动。
Azure spot 虚拟机自启
https://saika.us.kg/2024/11/07/az100-spot-auto-start/
- Author:NetSec
- URL:https://blog.51sec.org/article/141fc8e8-dcfd-81b0-9b6c-f7512249dd58
- Copyright:All articles in this blog, except for special statements, adopt BY-NC-SA agreement. Please indicate the source!


